If you are a self hosted customer, ensure you are running at least ITAM 8.1.0.3! ITAM 8.1.0.5 resolves several quirks in nuanced configurations so that is highly recommended as a minimum.
Overview
Data gathered by the TDx ITAM platform can be exported to your TeamDynamix Work Management (TDx WM) helpdesk instance. These instructions walk through that integration. Set aside approximately 60 minutes to walk through the steps outlined below. Set up is required in both TDx WM and TDx ITAM. We strongly recommend you test in your TDx WM sandbox before syncing with production. On the TDx ITAM side, the integration is accomplished via the TDx Work Management extra in the TDx ITAM web interface.
Upgrade Notes
If you were running the previous Sync with TeamDynamix script in your ITAM (formerly AllSight) instance, there are some differences in this new method. Most notable of course is you can disable the old script and enable and configure the Extra instead. We also no longer use the external ID field in WM which allows that to be repopulated/repurposed. Because many attributes are now built in, you can also remove many custom attributes that were needed when using the script. See the table at the bottom of this article for the field list.
Note that while the old script could be run against one or more select computers, that is not possible with the Extra. To a large degree the improvements to the API rates along with the ability to sync only a chosen Section of computers compensates for that change in flexibility. If you did need a targeted on demand sync, you can still use the script in conjunction with the Extra. Ensure you have disabled the schedule of the script and configure it as needed for this, preferably in a minimal manner. You don't want conflicting configuration in play creating confusion, but again be mindful of the use of the external ID field in the script.
Caution:
Remember that you can not delete artifacts in TD WM easily if at all. You can not bulk delete assets without using the API which can be cumbersome. You can not delete an asset application once created. We strongly advise the following precautions:
- Always use your Sandbox for initial configuration and testing, not production.
- Create a new asset app in Sandbox for the initial test syncs. Because it's sandbox you don't have to be concerned about the new app as it will be removed in the next quarterly production clone.
- Once tested, then sync to an app that contains assets that will be updated by the sync. This way you validated initial creation cleanly, then validate update impacts.
- Initially, choose "Do not Sync" for the Software option in the Extra. Once the basics are tested in asset records then turn on Software sync to validate CI creation and relationship creation.
- Create a Section in ITAM with minimal computers for an initial test sync. You can easily delete and move artifacts in ITAM so leverage that flexibility from the source end.
- Test and examine test results in the asset and CI records extensively. Be sure all details are in order, all changes are reviewed, all record types and relationships have been checked. Verify impacts on things like Models and Locations.
- Once you are satisfied with the results, clone the setup for your production instance.
Objects created by the Sync
- Assets (one per computer/device, given optional creation of these in the settings)
- Manufacturers and Models (optional choice to sync Model to Assets/CIs)
- Statuses (Lifecycle Stages) (optional choice to sync Lifecycles Stage (Status) for Assets/CIs)
- Configuration Items (one per Discovered ITAM software product, optional choice to sync Software Audit information for Assets/CIs)
- Product Types (Desktop, Laptop, etc)
- Vendors (optional choice to sync Reseller (Supplier) to Assets/CIs)
- Locations/Rooms (optional choice to sync Building (Location Tag) for Assets/CIs) (Room can only sync to WM if there is a Building to sync to Location)
Setup in TDx WM
Verify Compatibility (legacy, on prem)
TDx ITAM/Sassafras 8.1.0.2 and WorkManagement 12.1.16.1 are required for the new integration to work. Hosted customers will be on these versions or later, on prem customers must ensure they are up to date.
Gather Prerequisites
- Determine the base URL of your TeamDynamix instance.
(e.g. https://[myinstance].teamdynamix.com)
- Determine an appropriate Name and Password for a new TeamDynamix user record (to be created and assigned minimal permissions for the integration in a later step).
- On Prem customers: ensure that traffic initiated from the ITAM host server can reach the TDx WM instance on port 443 (i.e. generally that outbound traffic is not blocked).
- Although we assume customers are using the software audit functions of TDx ITAM, it's important to note that if you have computer audits (set by Division or Computer) or the Product Audit (server General Settings) disabled, you will not have the related data to sync to TDx WM.
Note: All of the following steps in TDx WM will be in the Administrator UI (TDAdmin), NOT in the end user facing UI (TDNext). All steps must be completed in both Sandbox and Production in order to use the same credentials in either instance.
Create a Global Security Role
Define a global security role for a new TDx WM integration user account (TDAdmin > Users & Roles > Security Roles):
- Name (example): ITAM Integration
- License type: Enterprise
- Grant the following Permissions:
- Acct/Dept
- Create Accts/Depts
- Edit Accts/Depts
- Modify Acct/Dept Hierarchy
- All
- Create and modify the list of locations and their rooms
- View All Accts/Depts
- View All Application instances in Analysis
- View All Time Report Types
- View All Types
- View People from All Accts/Depts

Configure Permissions Within Asset Application
- From the TDAdmin Home page, click Applications.
- Choose an Application to sync AllSight data to (must be an "Asset App" like Assets/CIs) and click it's name.
Note: These steps must be completed for each application you will want the service account to sync data to. The integration can have multiple configurations, each one set to sync different assets to different applications. You can not have multiple syncs to a single application as that is not best practice and can be hazardous.
You may want to initially make a totally new asset app in sandbox for testing rather than use one of your existing apps. Remember to NOT make test apps in production as they can not be deleted once created!
- Click on Users & Roles > Security Roles and click New
- Name (something different than the global role above): e.g. ITAM Role
- License Type: Enterprise
- Select the following Permissions.
- Asset
- Create and modify product types/product models of assets
- Create and modify vendors of assets
- Create assets and configuration items
- Import assets
- Modify assets and configuration items
- Update assets
- Configuration Item
- Import configuration items
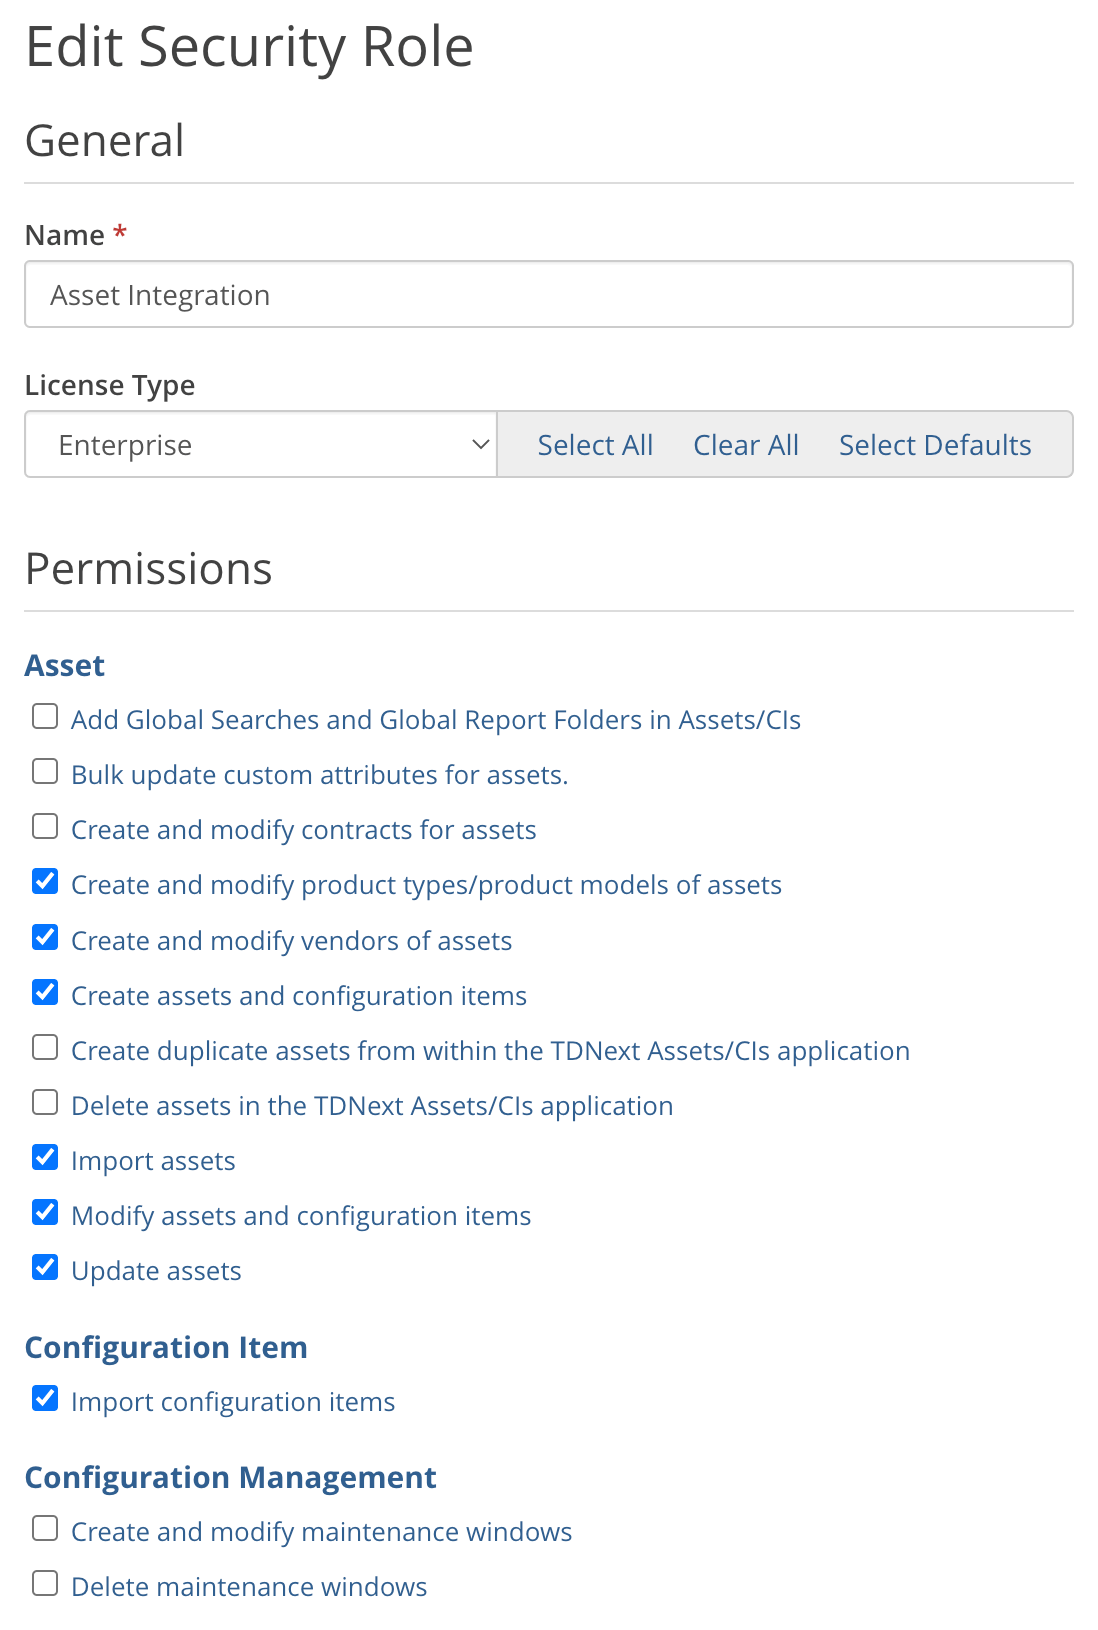
- Click Save
Create a User and grant Application rights
- In TDAdmin, create a User or Service Account to use for the data sync (TDAdmin > Users & Roles > Users > + Create > Create User). Enter a Username and click Next. We recommend using something like "ITAM Sync" so it will be clear which data has come from this integration and what the account is for in an audit. On the next screen, enter the required fields which may include:
- Security Role - Choose the global security role defined above (e.g. "ITAM Integration")
- First Name - e.g. ITAM
- Last Name - e.g. Sync
- Auth Provider - TeamDynamix
- Password & Confirm Password
- Auth Username - same as Username
- Enable "This account is exempt from password expiration"
- Set Primary and Alert emails to something generic or service based as you deem appropriate
- Click Finish
- Click Applications on the sidebar (you should still be in the popup window for the user you just made)
- For each Asset/CIs application you want this account to be able to access in the integration:
- Check the box next to the Application
- Choose the Security Role created above (e.g. "ITAM Role")
- Check the box for App Admin
- Save and close the popup
- Reload the Users page in your browser so you see the new account
- Note the Username for the user. It is likely itamsync if you made the name ITAM Sync. Use the short username in the configuration in the ITAM platform below.
Create Custom Attributes for additional ITAM fields (optional)
A number of fields/attributes are built in to the integration, which are detailed in the Alignment section below. Most of these fields are under the Discovered Data tab in TDx WM. Note this data can not be viewed in TD Admin. Other fields are built in to the Asset Form (like Asset Tag, Model, and Location). These fields along with the links between the asset records in both platforms will likely satisfy the majority of customer use cases. However, you can add additional attributes in TDx WM to cause additional fields to sync from TDx ITAM.
- For Computer fields, navigate to TDAdmin > Applications > [Asset Application] > Asset Attributes and click + New to add each new field (one at a time).
- The names of the new attributes should begin with "ITAM: " (see the Prefix option mentioned below) and match the column names from the KSComputers or KSDevices tables (with spaces added between words). Note you drop the table name from the field (e.g. computerDivision becomes ITAM: Division). If you want to add specific properties beyond what is documented here, contact Support for assistance as needed.
NOTE: For date fields, you can choose between Date/Time Picker (if you want to see the exact time) or just a Date Picker. All other fields should have an Attribute Type of "Text Box".
There are several special fields that do not appear in the tables document that can be used in TD Attributes that may be of interest:
- ITAM: TPMPresent
- ITAM: SecureBoot
- ITAM: UEFIBoot
- ITAM: DiskEncrypted
- ITAM: DualBoot
- ITAM: Display
- ITAM: Local IPAddress
- ITAM: Network - list of all network interfaces and MACs
Setup in TDx ITAM
Enable the Extra
- Log into TDx ITAM's web interface and navigate to Settings -> TeamDynamix.
- Enter the Base URL of your TDx WM instance.
- Enter the Account Name and Password of the service account you created above.
- Click Save.
- Click Check Credentials to validate the connection.
- If the URL is outlined in red, check for typos and that you only put in the BASE url, no /TDNext stuff on it
- If the credentials outline in red, you may be ok if you ONLY set up the service account in Sandbox not Prod. Only when the credentials succeed in both will they turn green. You can proceed to next steps if you've only set up SB to verify if things are in fact working in the Extra.
- Navigate to Settings ->Extras
- Check the box next to the TDx Work Management extra to enable it.
- Refresh your browser. You will now see this extra listed on the main Extras page (not the Settings -> Extras page).
- Click Open on the Extra widget on the main Extras page, or click TDx Work Management in the expanded list of Extras on the main sidebar navigation.
Add an Asset Application
- Click on the + drop down in the upper left to add a TDx Work Management Asset/CI application for synchronization.

You will be shown a list of Asset applications in the drop down that the account you created has access to per your above configurations. If you see nothing, check your configurations in TDx WM again and the credentials themselves in the settings.
If there is a permissions issue the drop down may give an indication of the problem, such as:
- 404 error if the Instance URL you entered in Settings is not valid
- 403 error if the credentials entered in Settings are not valid
Note: if you have set up the user created above in both your sandbox instance and production then applications from both will be listed in the drop down. Sandbox applications have "(sandbox)" appended to their names.
- Select an application to add. We strongly recommend you select a sandbox application to start.
The app you selected will become a button at the top. You can add more apps and each will appear for you to select to change their settings. If there are no more apps available to the service account the + drop down will not be shown.
Each configured app has three main sections to it. Settings, Summary, and Details. Click the up/down arrow next to each to expand/contract that section.
Caution:
Remember that you can not delete artifacts in TD WM easily if at all. You can not bulk delete assets without using the API which can be cumbersome. You can not delete an asset application once created. We strongly advise the following precautions:
- Always use your Sandbox for initial configuration and testing, not production.
- Create a new asset app in Sandbox for the initial test syncs. Because it's sandbox you don't have to be concerned about the new app as it will be removed in the next quarterly production clone.
- Once tested, then sync to an app that contains assets that will be updated by the sync. This way you validated initial creation cleanly, then validate update impacts.
- Initially, choose "Do not Sync" for the Software option in the Extra. Once the basics are tested in asset records then turn on Software sync to validate CI creation and relationship creation.
- Create a Section in ITAM with minimal computers for an initial test sync. You can easily delete and move artifacts in ITAM so leverage that flexibility from the source end.
- Test and examine test results in the asset and CI records extensively. Be sure all details are in order, all changes are reviewed, all record types and relationships have been checked. Verify impacts on things like Models and Locations.
- Once you are satisfied with the results, clone the setup for your production instance.
˅ Settings
This is where the configuration happens, and there are a number of sub sections under Settings to configure.
General
- Select whether you'd like to sync all sections within TDx ITAM to the TDx WM application or only those computers and optional devices under a single Section. If you are not familiar with Sections, they are access rights containers that contain Divisions. See this article for more details.
- Choose whether to have the integration Create New Assets in the TDx WM application for computers/devices in TDx ITAM that are not already in the TDx WM application. If you do not enable this option, only changes will be written to existing records.
- Choose which Asset Form to use to edit newly created assets in the TDx WM application.
Note: if you subsequently change the form, the new form setting will only apply to assets that are newly created after you make the change. The form on existing assets will NOT be updated.
Matching
In most cases, selecting Serial Number from the drop-down is the most reliable way to match TDx ITAM Records against TDx WM records (as long as pre-existing TDx WM records have Serial Numbers recorded). We also highly recommend Serial for the creation of new records, and this corresponds to most sites using Serial as the primary Computer ID in ITAM.
If you select "Best Match" as the matching option, use the three toggles that will appear below the drop-down to specify which fields to use to attempt to find a match. This can be useful when you need to sync both physical assets using serial, as well as virtual assets using Name.
Note: devices are always matched by serial number.
Attributes
- There are a number of attributes that exist in both TDx WM and TDx ITAM. Some of these attributes can be synced bi-directionally (Asset ID, Lifecycle Stage/Status, Department, Building (Location Tag), Replacement Date). Use the drop-downs to specify whether to sync these, if so which direction and if both which platform takes precedence. Options can include:
- Do not sync
- Sync to Work Management
- Sync to TDx ITAM
- Sync Both Ways (Work Management overrides)
- Sync Both Ways (TDx ITAM overrides)
- Some of these attributes can be only synced to TDx WM (Model, Reseller (Supplier), Purchase Cost, Purchase Date). Use the drop-downs to specify whether or not to sync these to the TDx WM application.
- Owner can only be synced from TDx WM to TDx ITAM. This is because in TDx WM the field is linked to user accounts and we do not want to arbitrarily create those in the integration. Choose whether or not you want to pull this into ITAM.
- For Lifecycle Stage/Status, you can optionally specify mappings between Lifecycle Stages in TDx ITAM and Statuses in the TDx WM application. Several things to note about Lifecycle Stage/Status are as follows:
- By default the TDx ITAM lifecycles stages of Deployed and Stocked will map to the TDx WM statuses of In Use and Inventory respectively. You can override these defaults with custom mapping options.
- Statuses will be created in the TDx WM application for any lifecycle stage that exists in TDx ITAM, doesn't match a status of the same name, and is NOT specified in a mapping.
E.g., if a computer has a lifecycle stage of Maintenance when it gets synced to the TDx WM application, and Maintenance has not been mapped and does not exist as a Status, Maintenance will be created in WM.
- No new lifecycle stages will be created in TDx ITAM as the result of this integration.
- If you choose to use additional mappings and create additional Statuses in the TDx WM application to do so, you will need to create those Statuses in both your sandbox instance and production.
- You may add additional mappings by selecting a lifecycle stage and status in the drop-downs. The mapping will be added and a new row will appear to specify another mapping. To remove a mapping, select the blank option in the drop-down for both lifecycle stage and status. The mapping will be removed.
- If you wish to sync additional custom attributes, specify the Custom Attribute Prefix you used when creating the custom attributes in the TDx WM application (e.g. ITAM).
Computers
- Specify whether or not to sync Dormant computer to the TDx WM application. This is uncommon as these are typically records for retired hardware so they are not useful in your ITSM platform.
- Optionally specify a Computer Filter to further exclude computers from the sync. This follows the syntax used in Filters on the Computers page of ITAM.
- The TDx WM application will have a link on the Discovered Data tab of the computer's details page to open the computer in TDx ITAM. Optionally specify the computer Form that computers will be opened in TDx ITAM when that link is used. The form specified here will be used when an asset is updated in the TDx WM application as well as when it is initially created.
Devices
- Specify which Device Categories to include in the sync to the TDx WM application.
- Optionally specify a Device Filter to further exclude devices from the sync. This follows the syntax used in Filters on the Devices page of ITAM.
- The TDx WM application will have a link on the Discovered Data tab of the device's details page to open the device in TDx ITAM. Optionally specify the device Form that devices will be opened in in TDx ITAM when that link is clicked. The form specified here will be used when an asset is updated in the TDx WM application as well as when it is initially created.
Software
- Use the drop-down to specify whether to sync software audit information to the TDx WM application. This will make a CI in WM for each Product in ITAM, as well as the relationships between the CIs and computer Assets. You can choose if you want to sync Products, Families, or Both.
Note: Once a CI is created it will not be removed in the future, even if there are no longer any Asset relationships.
- Specify whether to include web products.
- Choose which CI Form to use to edit newly created CIs in the TDx WM application.
Note: If you subsequently change the form, the new form setting will only apply to CIs that are newly created after you make the change. The form on existing CIs will NOT be updated.
Schedule
˅ Summary
Information on when the last sync occurred and when the next one is scheduled for appears in the "Summary" section of the tab.
˅ Details
Information about the settings used in the last sync as well as a log of the sync appears in the "Details" section. If the settings used in the last sync differ from the current settings, this will be indicated. By default, only errors and a high level summary of the sync log appears in the details section. If there are no errors, only a single line saying when the sync started and completed is displayed by default. To see the entire, log toggle the "Show complete log" switch.
Moving to Production
Assuming you have started the integration process with a TDx WM application in your sandbox instance once you are happy with the integration you will want to "move" it to production. This can be accomplished as follows.
- Use the drop-down in the tab bar to add another TDx WM application to the extra. Once a second application has been added, a Transfer Settings button will appear on the tab for each application.

- On the tab for the production application, click the Transfer Settings button. A dialog will appear.

- Select the application from which you wish to transfer settings (i.e., the sandbox application you previously configured).
- Optionally disable the sync for the application from which you are transferring settings.
As noted above, various items (custom attributes, statuses) need to be set up in both applications for the transfer of settings to be truly successful. Also note that you can transfer settings between two production (or sandbox) applications. This might be handy if you were syncing one section to one application and another section to a second application.
Automatic Data Integration
In addition to data imports from ITAM Computer and Product fields as described above, some additional data is recorded in TeamDynamix for respective objects automatically:
- Asset Product Types named "Desktop Computer", "Laptop Computer", and "Virtual Computer" are created as needed.
- Asset Statuses are created as needed.
- Vendors and Product Models will be added as needed (for computer/asset entries).
Additionally, if "Include Software Audit Relationships" is turned on:
- A Configuration Item Type named "Software Product" and/or "Software Family is created.
- A Configuration Item Relationship Type named "Installed on" is created.
- Relationships between Assets (computers) and CIs (products) will be added according to audit info.
Additionally, if any device categories are enabled:
- A Configuration Item Relationship Type named "Peripheral for" is created.
- Relationships between Assets (e.g. displays and computers) will be added according to audit info.
Data Alignment
Several default fields exist in the integration, and the behavior of how data is synced between platforms is chosen for certain fields in the Mapping tab of our script. For clarity of those built in fields (as opposed to the custom Attributes you create for anything else), we offer this chart.
| TeamDynamix Attribute |
ITAM Field |
WM Tab |
Sync Options |
| Service Tag |
Asset ID |
General |
5 choices |
| Owner |
Owner |
General |
2 choices |
| Owning Acct/Dept |
Department |
General |
5 choices |
| Location (and Room) |
Building (and Room) |
General |
5 choices |
| Model |
Model |
General |
2 choices |
| Product Type |
Form Factor |
|
|
| Purchase Cost |
Unit Price (from linked Purchase) |
General |
2 choices |
| Status |
Lifecycle Stage |
|
5 choices |
| Supplier |
Reseller |
General |
2 choices |
| Serial Number |
OEM Serial Number |
General |
|
| ITAM ID |
ITAM ID |
Discovered Data |
|
| Name |
Name |
Discovered Data |
|
| Manufacturer |
Manufacturer |
Discovered Data |
|
| Model |
Model |
Discovered Data |
|
| Domain |
Domain |
Discovered Data |
|
| CPU Description |
CPU Description |
Discovered Data |
|
| CPU Speed |
CPU Speed |
Discovered Data |
|
| RAM Size |
RAM Size |
Discovered Data |
|
| Disk Model |
Disk Model |
Discovered Data |
|
| Disk Size |
Disk Size |
Discovered Data |
|
| Disk Capacity |
Disk Capacity |
Discovered Data |
|
| Disk Free |
Disk Available |
Discovered Data |
|
| Video Manufacturer |
Video Manufacturer |
Discovered Data |
|
| Video Model |
Video Model |
Discovered Data |
|
| OS Family |
OS Family |
Discovered Data |
|
| OS Type |
OS Type |
Discovered Data |
|
| OS Version |
OS Version |
Discovered Data |
|
| OS Install Date |
OS Install Date |
Discovered Data |
|
| Client Version |
Client Version |
Discovered Data |
|
| IP Address |
Last Address |
Discovered Data |
|
| MAC Address |
MAC Address |
Discovered Data |
|
| Wireless Address |
Wireless Address |
Discovered Data |
|
| User Name |
Last User |
Discovered Data |
|
| On Loan To |
On Loan To |
Discovered Data |
|
| Division |
Division |
Discovered Data |
|
| Last Audit |
Last Audit |
Discovered Data |
|
| Last Login |
Last Session |
Discovered Data |
|
| Purchase Date |
Purchase Date |
Discovered Data |
2 choices |
| Replacement Date |
Replacement Date |
Discovered Data |
5 choices |
| Custom Attributes |
Custom Attributes |
General |
|
Notes on Alignment
Product Type/ Form Factor: In Work Management the Product Type is created when a Model is created. This is based on the Form Factor in ITAM. If you have pre-existing Types in WM you will want to align them with the hard coded Form Factors in ITAM. Those are:
| Standard |
| Laptop |
| Virtual |
| Hosted |
| Mobile |
| Server |
| Desktop |
| Mini |
| All-in-one |
| Convertible |
| Notebook |
| Tablet |
| Mini-tower |
| Micro |
| Ultra-small |
| U1 Server |
| U2 Server |
| U4 Server |
| Blade Server |
Model: Although we make effort to trim out known anomalous model names from manufacturers, there is no larger effort to "normalize" variations in a product line in ITAM. Therefore, the exact Model is sent to WM, but there is a notion in service management of normalizing models. While there are possible methods using iPaaS to automate this based on table lookups, you should consider if this is worth the effort as compared to allowing the granularity in the data. This is also why you can not sync Model from WM to ITAM, it would be corrected by the next agent check in.
Owner: Because this maps to a user account in WM, we can not sync from ITAM to WM as we would be creating accounts and that's a bad idea. As such this can only sync from WM to ITAM. You can however add ITAM: Owner as a custom attribute if you want to carry this over to WM as a reference point. This choice will depend on your workflow, the integration is flexible.
Location/ Building+Room: In Work Management, the Location is a combination of Building and Room, for which ITAM has individual fields. You can not have a Room in WM without a Building. As a result, depending on the sync direction you choose, we can not set the Location in WM if the source in ITAM only has a Room and not a Building. Note also there is a Location field in ITAM, but in historic terms this is more of a geographic concept as compared to in WM where it's the building information. This can cause confusion at first until you understand the data structure, intent, and history of the platforms.
Other Options
Forms
You can create your own form views for Assets in TD. This means that you could change the order in which fields appear. You could also label fields in a cleaner way that didn't include the prefixes ("KS:" or any other one you configure with the newest version of the script like "Sassafras:"). If you are using ITAM as the source of data in your Mapping settings, you can also set the relevant fields as Read Only. This way no one makes a change in TDx WM that will simply be overwritten in the next sync.
Navigate to TDAdmin > Applications > [Asset Application] > Asset Forms to manage these view options.
Embedding
TeamDynamix has the ability to embed content in their platform. ITAM has long had a rich set of options for embedding all of its content in various ways. This allows you to embed maps, software lists, widgets, and other elements in your TDx WM Dashboard.
For more information on embedding in Work Management , see this article.
Simply, you can navigate to TDAdmin -> Organization Settings -> HTML Content Allowlists -> Iframe Sources and enter the address of your ITAM server.
Then to make an embed, navigate to TDAdmin -> Dashboard Templates -> HTML Modules -> New and click the Source button and put in something like:
<p><iframe allowfullscreen="" frameborder="0" height="360" src="//demo.sassafrascloud.com/frame-core/maps/std/4783dbdfa1074b2780322e31228ec25d" width="640"></iframe></p>
Then navigate to TDNext -> Desktop, and click "edit blah Desktop" near the top, and your new embed would be a choice in possible content.
For information on embedding ITAM content, see our Embedding documentation.
Troubleshooting
Here are a few common mistakes and simple things to check if you're having issues.
Clicking Check Credentials in the Settings page has red boxes.
This can happen for a couple reasons. If the URL box is red, make sure you put in a valid URL. This should JUST be the base URL of your TD instance, like https://mysite.teamdynamix.com
If the credentials boxes are red, then those creds are not valid in either the production or sandbox instance or both. You can check in the Extra to see if any Apps are listed for addition, which will tell you if the problem is only one of the instances.
The sync seems to not be sending all data.
If the last line of the Log output isn't something like the following (indicating start and finish times), then it did not complete/it crashed for some reason:
Sync start: 2026-07-09 10:47:19; finish: 2026-07-09 10:48:27
When I click on the + to add an asset app in the Extra, I don't see all my apps.
Note that any asset app in the Sandbox will have (sandbox) on the end of the name in the list. With this, and the above checking the credentials, you can validate if the service account is set up in production and sandbox and has been granted app admin on the asset apps in question.
It's all set up but it's not working!
So one common issue is the URL you set in the Settings is NOT simply the base URL of your TD instance. That is, you appended something like /TDNext or /Sandbox or something. So while the URL is technically valid and lights up in green, nothing is actually being found at the assumed paths that are appended to the base URL in code. So make sure this is just the base URL if everything else seems green.
I keep verifying the credentials but they keep being red!
If you have a password manager in your browser, disable it. We commonly see that password managers are TOO helpful and will silently insert the wrong password from stored credentials, replacing what you think you are typing in to the settings.