Body
Scripts are little helpers that can be rather basic or extremely complex in their functions. They are written in Javascript, and while a large library is supplied by TeamDynamix, you can use our documentation to create your own as well. You can also request special development of a script from our team, please open a support ticket or contact your CSM to inquire further.
Add IPP Printer...
You can use this script to add a new Printer Device that sets IPP as the service type, and immediately queries the device for additional attributes. It has a single input value for the printer IP address.
Add Tag to Listed Items...


Using this script you can leverage an input file to add a Tag to all of the designated records. The input file needs to be plain text with one entry per line (computer, user, etc as appropriate). This allows you to bulk tag selected computers, devices, users, etc. using an input source rather than hand selecting objects. Simply pick the input file and put in the tag you wish to add to the objects. For some objects like Users, you will need to use KeyConfigure as not all object types have a dedicated screen in the Web UI.
Add Tags...


Very simple script to add a specified Tag to the selected objects. Just choose multiple computers, users, etc. and run the script. Do this with normal shift/control/command clicks pending platform. You can add multiple tags at one time by typing each one (and clicking off of it to complete the tag creation in KeyConfigure). In the Web UI, the number of selected items which will be tagged is shown in the lower left. There is also an option to replace all existing tag(s) on the selected objects with the new one(s). See also Remove Tags...
Change Policy Expiration...
Basic script to change when selected policies expire. Uncommon use case, but manage policies can have an expiration date and bulk change may be needed in some instances. KeyConfigure use only.
Change Software Visibility...
Simple script to set if selected Products are visible in the "public" areas of the Web UI. That is, the Software page, and clicking on Computers on Maps to see their installed applications. This script is only usable in KeyConfigure. In the Web UI you can use the checkmarks instead in the Manage screen.
Computers Without Package
KeyConfigure only. A no option script that can be quite useful for deep inventory checking. It simply opens another window that contains a list of all Computers that do not contain the selected Package. Note you should only right click on a single selected package or results could be confusing/misleading.
Computers Without Product
KeyConfigure only. A no option script that is extremely useful. It simply opens another window that contains a list of all Computers that do not contain the selected Product. Note you should only right click on a single selected product or results could be confusing to say the least.
Create Okta Apps...

This script is used when implementing Okta authentication. It generates several unique keys needed for that integration. See our documentation on this OIDC module for full details.
Create PingIdentity Apps...
This script is used when implementing PingIdentity authentication. It generates several unique keys needed for that integration. See our documentation on this OIDC module for full details.
Export Computers to Jira

Used by customers with Jira as a helpdesk ticketing tool, this script will export computer records to your Jira instance. This is useful for using AllSight as the source of ITAM while using Jira for ITSM.
Export Detail URLs...
Used to generate URLs that can then be uploaded to Avery.com to print out QR codes for Devices and Computers. The resulting codes will open the URLs for those unique items. This allows easy scan of code labels to then edit and update device records when servicing in person. When running the script ensure the base url properly matches the Web Service URL (so there are no cert issue). It will then create an output file you can upload to the Avery site. See our Blog Post on this for steps on the Avery site.
Find Computers by Names...
Simple script that takes an input plain text file with one name per line and finds all matching computer records in the system.
Find Computers by Serials...
Simple script that takes an input plain text file with one serial per line and finds all matching computer records in the system.
Gather Warranty Dates...

This script will query all computers based on OEM Serial with Dell and HP using your relevant API key (required input) and populate the Warranty fields with the relevant purchase and expiry information. It will also pull Lenovo warranty expiration dates (no key required). Obtain your API key and Secret from your account reps. You can then choose to populate the Purchase and/or Replacement dates with the query results, replace or keep any values currently in the local records, and record the output if needed for troubleshooting. Note you can then use the Set Replacement Date script to build on this information automatically.
Geolocate via ipstack...
A robust script that Tags each Computer with a location based on the ipstack open database. Accuracy is of course no promise. You can sign up to get a free API key which is then the only input to the script. Execution will add tags to every computer record based on IP lookup. You can then create a Tag based Map Set and view computers by reported physical location of the IP. Because the maps are value tag based, re-running the script and therefore updating their location will update the map sets.
Import Devices from Google...
This script imports ChromeOS devices from your Google management console into the Computers list. It can be used on its own, or to gather information not available to the KeyServer Client for Chromebook. To configure this script, follow these steps:
In Google Cloud Console:
- Create a new project (or use an existing one)
- Enable the Admin SDK API for the project
- Navigate to APIs & Services > Enable APIs & Services
- Click + Enable APIs & Services at the top of the panel
- Search for "Admin SDK API" and click to select it
- On the Admin SDK API page, click the Enable button
- Create a Service Account
- Navigate to APIs & Services > Credentials
- Click + Create Credentials at the top of the panel
- Select "Service account" from the menu
- Provide a Service account name and description
- Click Done, and new Service account will be listed
- Create a new Key for the Service account
- Click the Service account in the Service account list to edit details
- Switch to the "Keys" tab at the top of the panel
- Click Add Key > Create new key
- Choose "JSON" Key type and click Create
- The key information will be downloaded to your computer as a JSON file
- Enable Domain-wide Delegation for the Service account
- Switch to the "Details" tab at the top of the panel
- Copy the Unique ID for the Service account onto the clipboard
- Expand "Advanced settings" in the main panel
- Click "View Google Workspace Admin Console"
- Navigate to Security > Access and data control > API controls
- Click "Manage Domain Wide Delegation"
- Click "Add new" at the top of the panel
- Paste the Unique ID into the Client ID field
- In the OAuth scopes field, enter:
https://www.googleapis.com/auth/admin.directory.device.chromeos.readonly
- Click Authorize to complete the process
- Configure the Script
- On the Settings / Scripts page, click the settings icon for this script
- In the Account field enter the email of any Admin for Google Workspace
- Drag the JSON file to the Credentials field
- Click Save to complete the configuration
Google Workspace requires that you provide an Admin account when accessing the device information. This account is only used to ensure appropriate access. By providing the account name you are not granting any permissions to this script other than those granted to the Service account you created. If you followed the steps above, the Service account (and therefore the script) will only have permission to read information about the ChromeOS devices you are managing.
Import from Intune...


This script can be used to import, synchronize, or both, based on serial number, and will work for Windows, iOS and/or Android devices managed in Intune. You can set these various options on the General tab of the script. If computers do not exist in KeyServer that are in Intune, they can be created in the Imported state. A client that then connects and matches the Serial based ID will move the record to Dedicated and update with KeyAcces data.
The option to Set Division from OrderID is highly specific and requires that the Divisions that match the imported values already exist.
The fields on the Mapping tab allow you to specify attributes in Azure to be mapped to the various computer fields in ITAM. Using the Division field will auto create matching Divisions to whatever attribute string is pulled in by the script, so use with caution. Ensure that the attribute you specify is a single string value, not something like Groups where there can be many values (because they would become one messy string). You can also use linked attributes, for example userPrincipalName:user.department or something as essoteric as userId:user.onPremisesExtensionAttributes.extensionAttribute3 in the Department field will pull the department of the user that is set as the primary or last user in the InTune record.
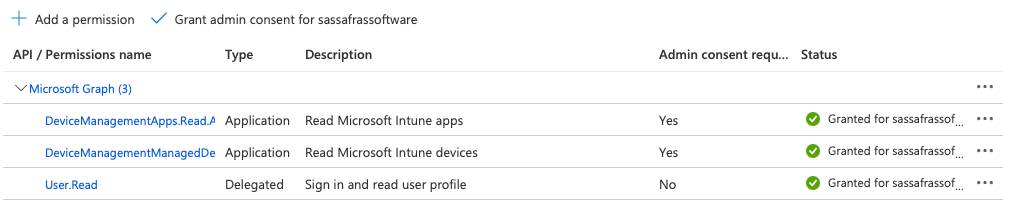
The Azure App configuration for which you need the Tenant, App/Client ID, and Client Secret Credentials is very basic. The app needs permission to read the InTune devices and configuration, so at the simplest it needs DeviceManagementApps.Read.All and DeviceManagementManagedDevices.Read.All. Also ensure these are Application permissions and not Delegated as the latter will not work. You may alter as needed for the security or tenancy of your environment of course, but if the app can not read a device it will not be imported.
Click here for more Azure details
This is a basic step through of making the needed Azure app if you don't already have one that can be used.
- Navigate to App Registrations and make a New Registration. You can name it whatever you like, nothing else is needed in the creation.
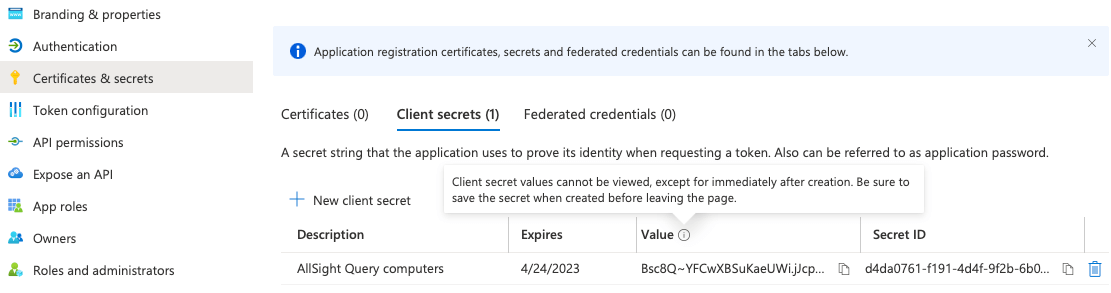
- Go to Certificates & Secrets, click “New client secret” to make a new secret.
- Copy the “Value” as seen below, you won’t be able to get this ever again. This is the “Client Secret” in our script:
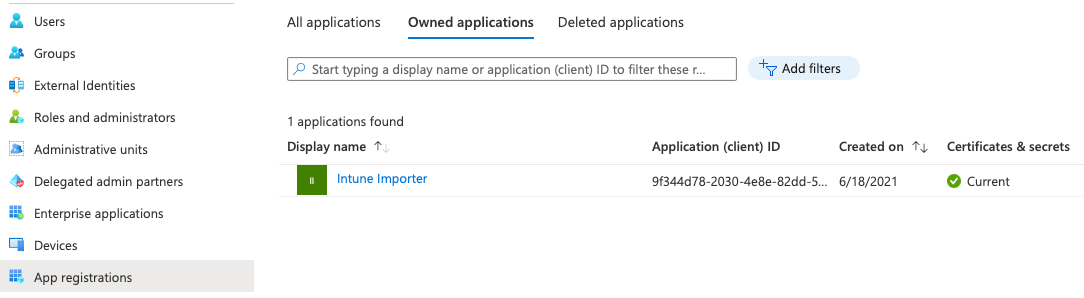
- Go back to App Registrations - the Application (client) ID is the “Client ID” for our script:
- Click the app again and go to API Permissions. Add the two permissions we need as mentioned above. These must be type Application not Delegated.
Don't be distracted by the "Secret ID" in the Secret, that is not used for anything. Microsoft's naming of these values is as confusing as possible.
Note that if you use the option to Set Division from Azure AD "OrderId" value, you must also add Directory.Read.All and Device.Read.All to the app permissions in Azure.
In the case of creating a record, the fields imported include:
computerOEMSerial
computerSystemSerial
computerBIOSSerial
computerUUID
computerLastAudit
computerName
computerModel
computerManufacturer
computerOSVersion
computerRAMSize
computerDiskSize
computerFreeSpace
computerMACAddress
computerWirelessAddress
computerUserName
computerOwner
computerServiceURL
computerPlatform
computerOSType
computerLastImport
In the case of an Update for an exiting record, only the fields on the Mapping tab will be updated, in addition to ServiceURL.
Import from Jamf...


This script will import and/or sync data from Jamf for MacOS, iOS, and/or tvOS devices. For full information see our dedicated Tech Note on this item.
Import Time Sets...
It is possible to create and update schedules on Maps by importing time set information from CSV. The format needs to be very precise so it is readable, so your source data may need to be adjusted to fit our format. See Time Sets for more details.
Import User Information from AD...

User records in KeyServer are created by the login names reported by the OS. This means you could have more than one record for the same person because of platform differences or even local vs domain accounts. There may also be additional data fields in your Active Directory records which we would have no knowledge of at the desktop level that you would like to have in the KeyServer record. This script is designed to help manage these concerns.
- It will pull in Department, Phone, and eMail fields from AD for all matching user accounts.
- You can specify which user attribute to use as the Primary Name in KeyServer, and then Alias the others to that account.
- Additional Aliases is a coma delimited field that allows you to alias other user attributes from AD
- External ID from allows you to populate the external id field with a specified AD attribute. This is searchable in the Loaner Checkout Extra in newer versions.
- If you specify an OU or Filter it will import all user records from that resulting location even if we currently have no matching records locally. This allows you to create records not just sync them.
- There are also options to write the results to a file for logging to troubleshoot issues.
There are several operational notes for this script.
- It will only work through the Web UI if the host server is a self hosted Windows server bound to AD. It can NOT be used in our hosted service (instead use the Azure script below).
- It will only work in KeyConfigure on Windows (not Mac) if you are logged in to the OS with a Domain account. This is because the script is executing in the context of the host computer environment.
- In either case, the host computer account or local user account that is executing the script must be able to query the domain user accounts.
- IF your AD allows anonymous queries of user accounts and properties, then there are no operational restrictions, but this tends to be uncommon.
- This script does not have a Merge operator like the Azure script, so you may want to use that script if you need true merging of records.
The List Users in AD Group script below may be a useful companion in some cases
Import User Information from Azure AD...


Similar to the AD script above, this seeks to import, sync, and alias user data from Azure. This would be the script of choice for cloud customers as AD is not accesible from a hosted server. This script is also more advanced than the AD one and provides Merge capability and additional options.
General
Ensure the credentials used in the script have the proper user and group read access in your tenant. If you are using Azure Authentication, you can use the same app in this script. For more details on this concept see the Azure module under OIDC Methods.
The drop down option lets you choose if you want to Create, Update, or Both, as well as Merge. If you only Update, then any records in KeyServer that match a lookup in Azure will have the chosen meta data under Options added to the records. Create will allow creation of User records that do not yet exist due to user Logon as gathered by KeyAccess. Merge is used when you have multiple user names for the same person from different platforms, and you want to collapse those into a single record and Alias the other names to the Primary.
The option to Import only Member type Users allow you to omit accounts in Azure that may be of a "Contact" nature. This concept should be familiar to an Azure admin.
You can also choose to only import users from a designated Group. This can be useful to limit the scope of records created if for example you have a group that has all "human" accounts but no "service" accounts.
Options
The choice of Primary Name is extremely important. It controls what record any data is synced back to, as well as what the User name will become if performing a Merge operation. Display Name is unlikely to be useful in most cases as it usually is not guaranteed to be unique. If you have 3 John Smith's then there will be a matching failure and you will not get the desired results. You should usually pick something that will be unique like Logon Name. This choice will be how User names are listed in all places in the platfrom after using the script (e.g. Last User on a computer, value searched for in the Owner field of an asset, etc). While it may seem enticing to use Display Name so this is very human readable, we remind you again it should be a value that will be unique. Note that the matching part is also critical. Account names in Azure tend to be logon@domain syntax, compared to Logon name just being what is in front of the @. So if your User records are all AD based account names in a hybid join situation, but they reflect the user part of the email address, Logon Name is the best choice here. If however your on prem account names are different from the email user name, you will likely be free to choose what you want as you'll be using the Merge operation to make significant changes.
Several choices are available for other attributes to be set as Aliases on the record. In a setting where perhaps Account is yflammer but Logon Name is yadin.flammer, you may want to use Logon Name as the Primary Name but the Account as an alias. When yflammer is used to log on to a computer, it's recorded instead in KeyServer as yadin.flammer.
Note the Additional Aliases allows for listing other Azure Attributes you want to alias to the record. A popular one is onPremisesSamAccountName when using hybrid AD. It is often the case that the old AD account name that everyone logs in to computers which is NOT the Account or Logon value in Azure. Therefore use of this attribute allows the translation in our records to happen by way of the alias.
External ID is a field in our User records. This can be set to any Azure attribute. Some sites like to use the DisplayName in this field, because you can show it as a column in user based reports along with email and the actual user Name (which may be the Account and therefore less human readable). This allows a point of reference to more easily tell who is who in a report.
You can also choose to import the Department value.
Specifying the e-mail domain is very useful when your Azure acount names are logon@domain syntax. This domain value will be appended (with @) to the user we have locally when searching for a match from Azure. This can help when the email is the primary account name in Azure, and is a construct of the on prem account name and domain.
The two Logging options are useful to turn on when trying to diagnose an issue. When the script finishes running you will be able to download the log to provide to support.
Import User Information from Google Workspace...


Similar to the AD and Azure scripts of the same name, this seeks to import, sync, and alias user data from Google. See the above scripts for relevant concepts. Many options are specific to Google and it's expected these will be understood by your Google admin.
List Users in AD Group...
KeyConfigure only. Utility script to list all local users that exist in a given AD group. Useful when setting up User based polices to ensure AD query is working and user attributes are matching. May be useful in conjunction with the Import User Information from AD script above.
Merge Imported with Discovered Computers

This script is useful in some instances when imported records didn't line up with records created by KeyAccess checkins. This can happen due to using an ID type other than Serial as the primary and importing records prior to client creation. Using this script you can choose how to merge the Import records with the Discovered records. To be clear, only Imported records are merged into non-imported records, when they match based on Serial or Name.
Move Computers...

Note in the Web UI this script is generally replaced by the Quick Edit feature which is more robust. This script can still be useful in KeyConfigure which lacks a bulk edit operation. You can select multiple Computers and change multiple attributes quickly at one time.
Remove Tags...
Very simple script for bulk removal of Tags from items. Simply enter the tag or tags you want to remove.
Reset Station ID
This is for troubleshooting and generally only used by Sassafras Software Support or at their direction. It resets a data field used to identify computers on maps that can become scrambled in some rare cases causing computers to not show as expected.
Search Computer/Device History...
Provides the ability to search for a certain event under certain event types across all assets in the platform.
Set Asset Fields...
Note in the Web UI this script is generally replaced by the Quick Edit feature. Simple script to allow you to set values on multiple Asset pane fields of multiple Computer or Device records at once. The Quick Edit feature in the Web UI supplants the need for this script, but it can be useful in KeyConfigure.
Set Deny Policy on Obsolete Products...

Using the values in the End of Life and/or End of Support fields in the Products, automatically create Deny policies for software to block usage of outdated software.
Set Lifecycle Stage from AD...
If you Disable computer records in AD rather than delete them, this script can be used to automatically move those corresponding (by name) records to a Dormant login state in AllSight.
Set Map Availability...
In addition to all other settings for Maps, you can select in each computer record if the computer will be shown on Floorplans. Use this script to quickly hide or show a number of computers at once by setting this flag.
Set Product Availability based on Public Floorplans...
If you only want Software to appear on the main software page of the Web UI that is installed on Computers that are on Floorplans (maps) that have been made public, this is an easy solution compared to setting the visibility by hand on all items.
Set Replacement Date...

Set the Replacement Date on all or select batches of computers based on various criteria. This can be useful when used in conjunction with the Gather Warranty Dates script. For example, if both are run on schedules, this one can set the replacement date to warranty date +1 year automatically.
Show Package Audit


Useful to show all Packages on a selected computer, or all Computers that have a selected Package. Similar to the Show Installs function that is built in to KeyConfigure Computers. You can choose one type of package or all types. Results will vary by Operating System.
Show Tagless Items
Opens a new window showing all selected items that contain no tags. Useful if you use Tags extensively and are looking for object that have not been tagged yet.
Sync with FreshService...
This script drives our integration with FreshService.
Sync with TeamDynamix...
This script is deprecated and should no longer be used. Please transition to the new Integration Extra if you are still using this old script.